Quickstart
MONAI Label provides several end-to-end (E2E) tutorials for quickstart of sample apps, 3rd part viewer setup, plugin installation, and datastore. The E2E tutorials include basic functions of MONAI Label, such as auto-segmentation, active learning. Users can try monailabel server within the notebooks with these tutorials. For full experience, it’s recommended for users to start monailabel server in local host machines.
Hone pagae of MONAI Label Tutorials
Radiology App: - MONAILabel: HelloWorld: Spleen segmentation with 3D Slicer setups. - MONAILabel: Web-based OHIF Viewer and Orthanc DICOM-web: OHIF and Orthanc DICOM-web server setup and installation.
MONAIBUNDLE App: - MONAILabel: Pancreas Tumor Segmentation with 3D Slicer: Pancreas and tumor segmentation with CT scans in 3D Slicer. - MONAILabel: Multi-organ Segmentation with 3D Slicer: Multi-organ segmentation with CT scans in 3D Slicer.
Pathology App: - MONAILabel: Nuclei Segmentation with QuPath Nuclei segmentation with QuPath setup and Nuclick models.
Endoscopy App: - MONAILabel: Tooltracking with CVAT: Surgical tool segmentation with CVAT/Nuclio setup.
In this page, users can follow some quick command lines for Radiology and monaibundle app.
Start Using MONAI Label with Sample Apps:
Tutorial 1 - Radiology
This example covers the annotation use-case for radiology using the sample MONAILabel App - radiology. MONAI Label server currently supports the annotation of local datasets via 3D Slicer, such as unlabeled images residing on disk, and remote data residing on DICOMweb-enabled PACS systems via both 3D Slicer and OHIF.
To setup a local dataset for annotation follow the instructions under DeepEdit Annotation with 3D Slicer.
To perform annotation of data residing on a remote DICOMweb-accessible PACS follow the instructions under DeepEdit Annotation Using OHIF.
DeepEdit Annotation with 3D Slicer
Deploy MONAI Label Server
On the local machine follow the commands listed below to install MONAI Label, download a sample application (Radiology), download a sample dataset (MSD heart MRI), and deploy the sample app and standard dataset on the MONAI Label server.
# install MONAI Label
pip install monailabel

# download Radiology sample app to local directory
monailabel apps --name radiology --download --output .

# download Task 2 MSD dataset
monailabel datasets --download --name Task09_Spleen --output .

# start the Radiology app in MONAI label server
# and start annotating the downloaded images using deepedit model
monailabel start_server --app radiology --studies Task09_Spleen/imagesTr --conf models deepedit
Install MONAI Label Plugin in 3D Slicer
Install 3D Slicer Preview Version with in-built MONAI Label plugin
Download and Install 3D Slicer Viewer version 5.0 or later.
Start 3D Slicer
On the menu bar navigate View -> Extension Manager -> Active Learning -> MONAI Label
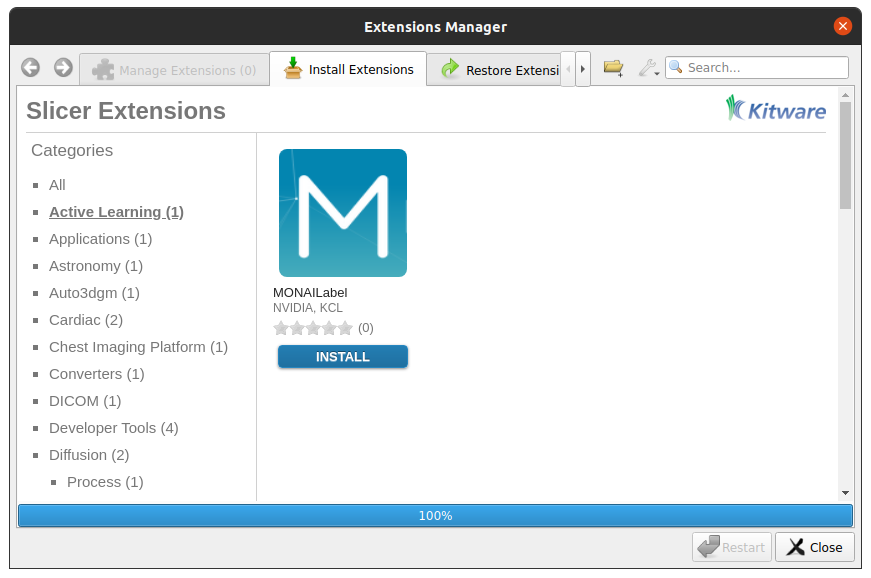
Install MONAI Label plugin (click “Install”)
Restart 3D Slicer (click “Restart” in the same dialog box)
To add the MONAI Label icon shortcut on the 3D Slicer toolbar
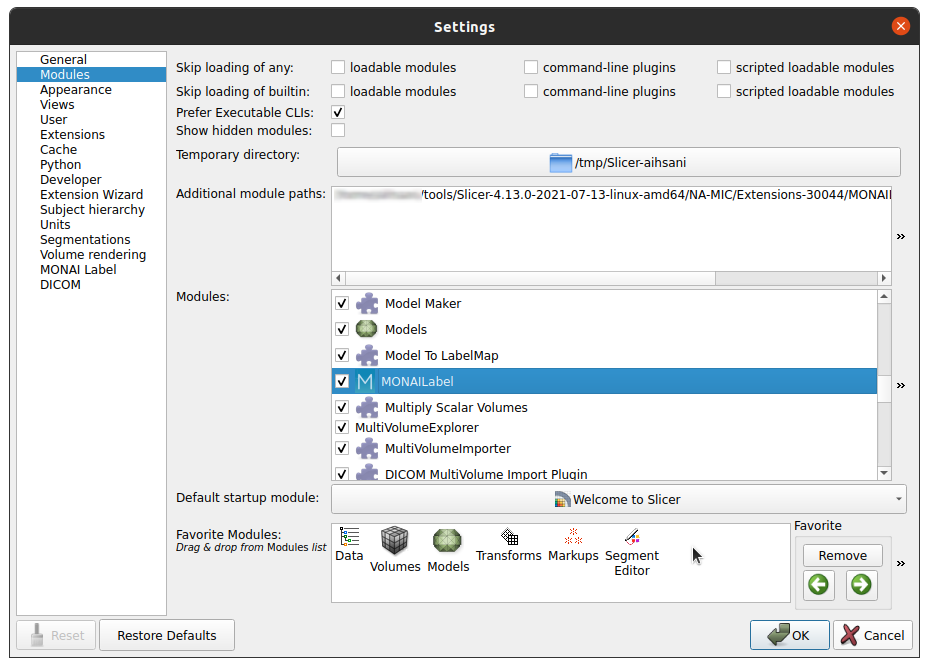
Navigate Edit -> Application Settings
Under the Modules panel drag MONAI Label into Favorite Modules
Restart 3D Slicer
Look for the MONAI Label module icon
 in the 3D Slicer toolbar
DeepEdit Annotation in 3D Slicer
To connect 3D Slicer to MONAI Label Server
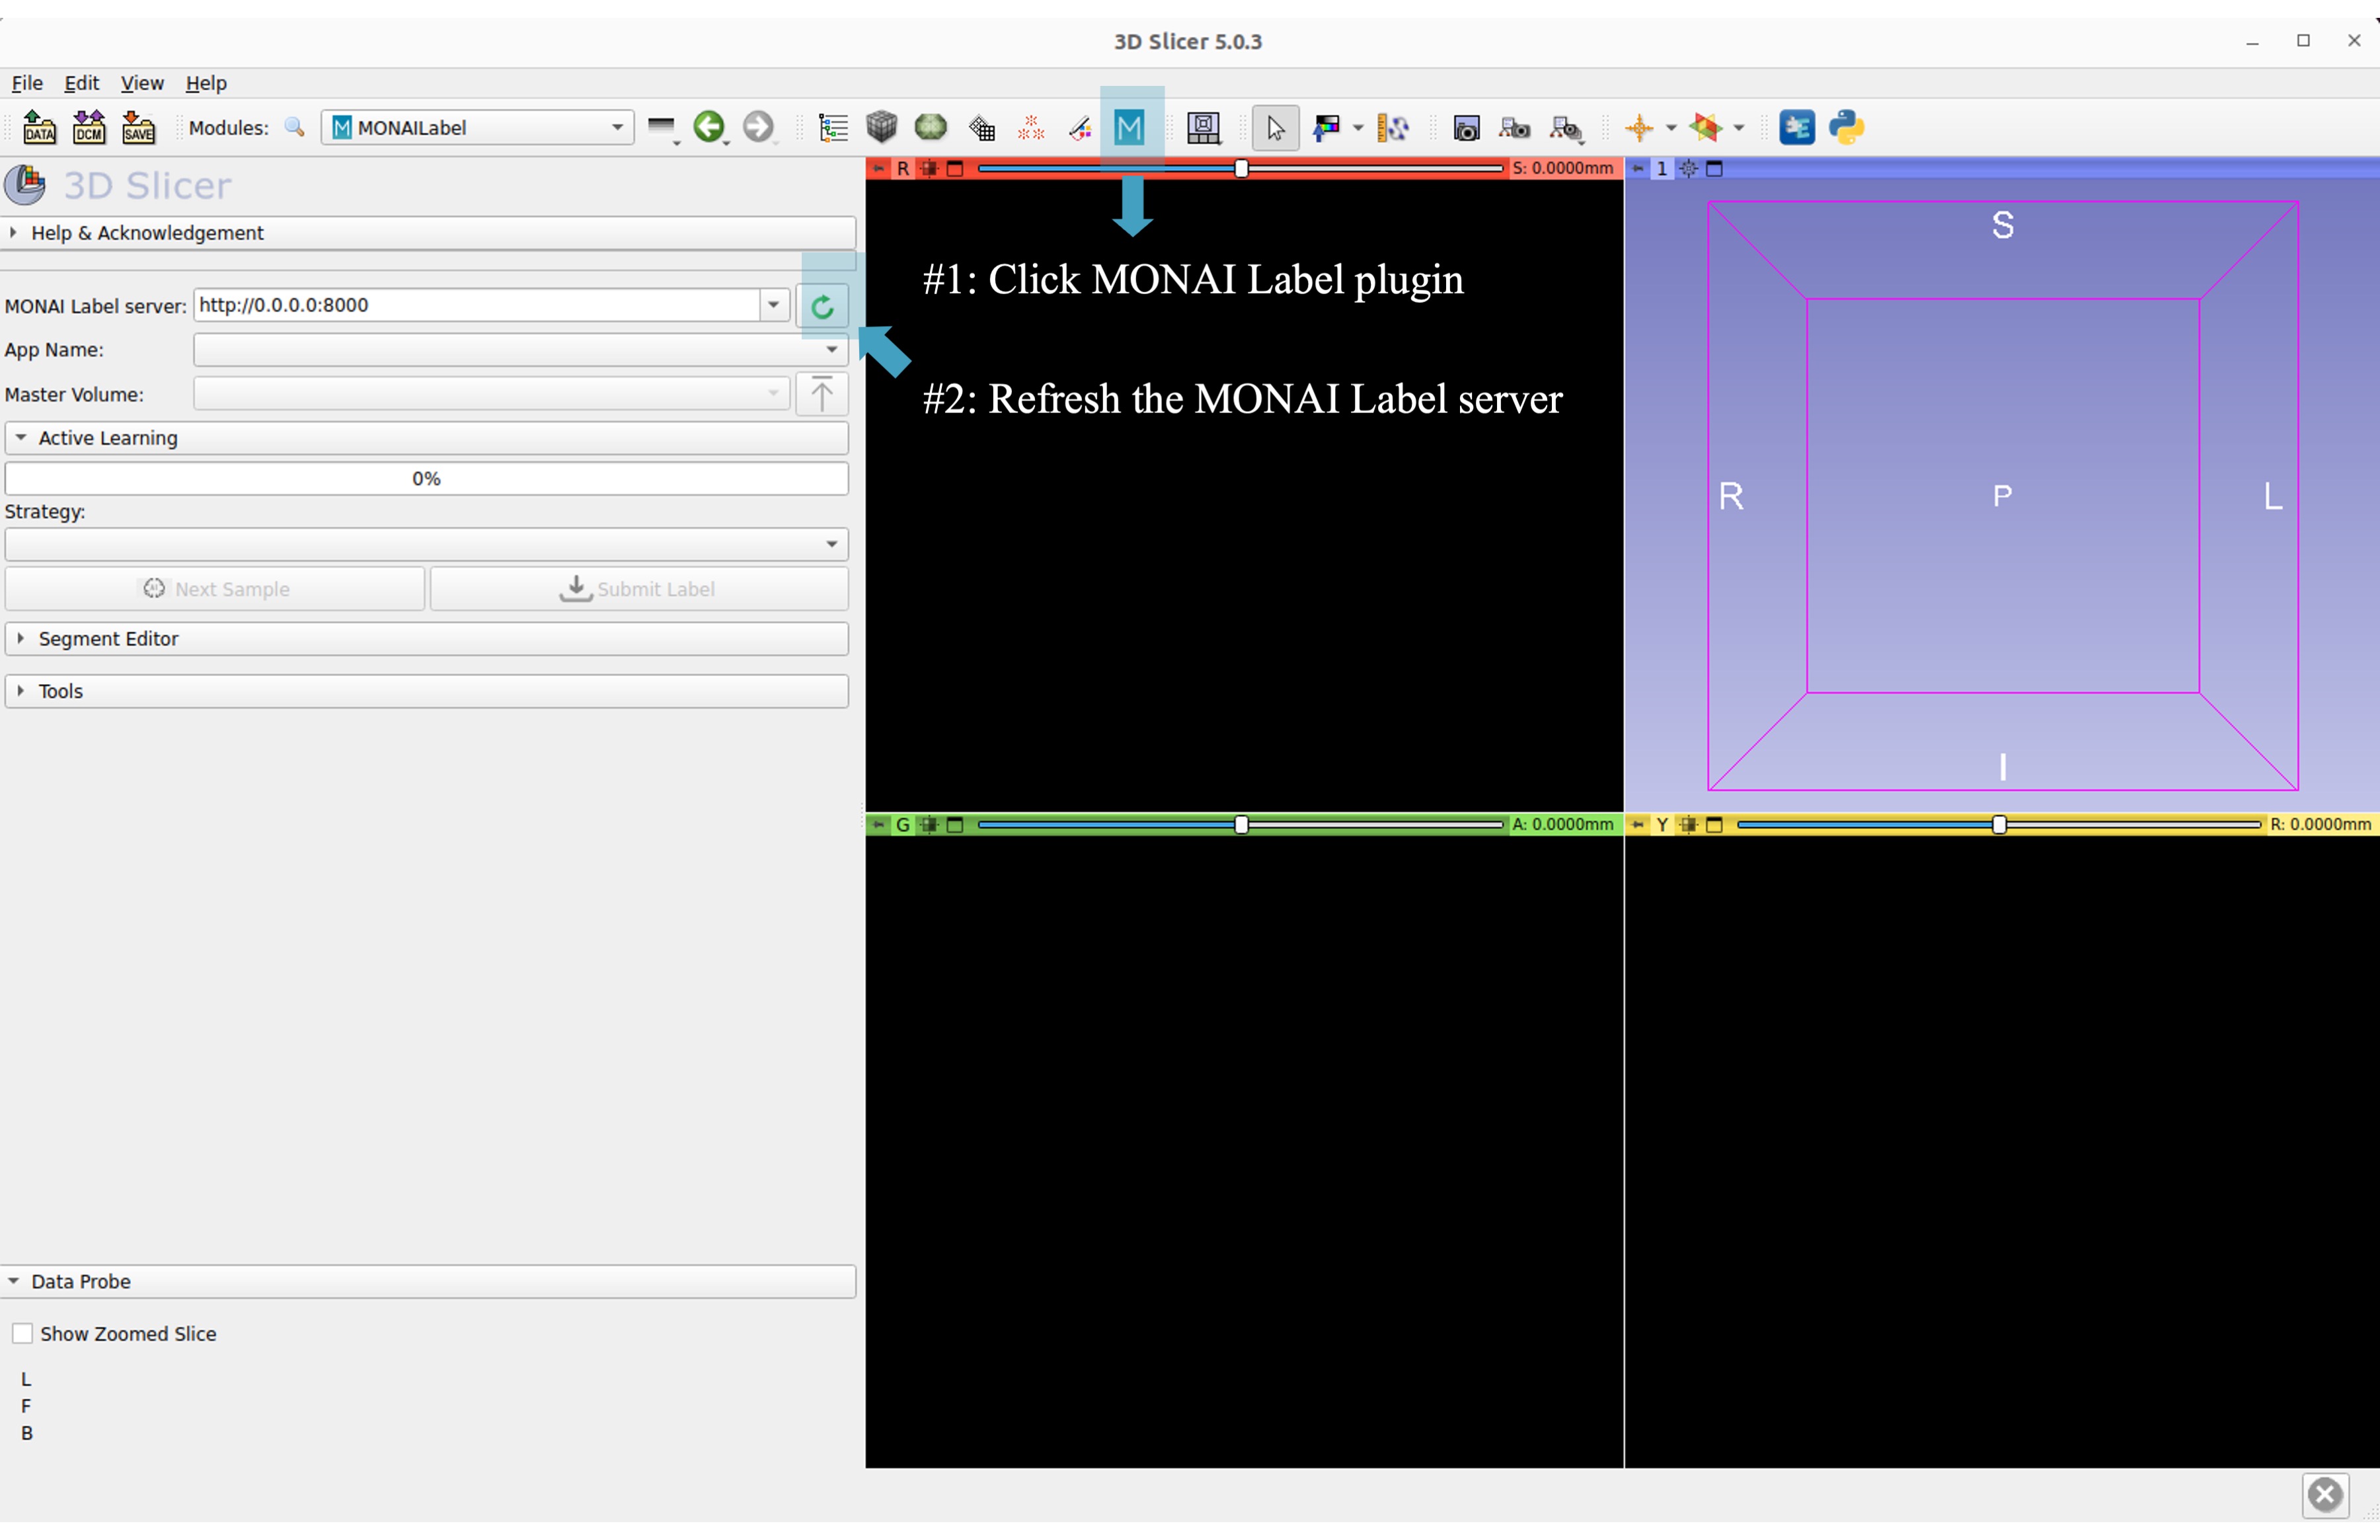
Click on the MONAI Label module icon
Click the refresh icon near next to the MONAI Label server input field
If the MONAI Label server is running locally to 3D Slicer you do not need to enter the server address

To annotate the downloaded heart MR images using DeepEdit
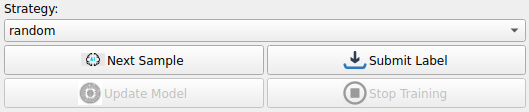
Click Next Sample under Strategy to retrieve an image from the heart dataset along with a segmentation result generated by DeepEdit
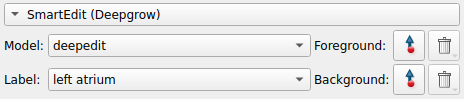
We can now start making adjustments to the initial segmentation provided by adding foreground and background points using the tools in the SmartEdit section
For example, click on the foreground button and start clicking on the image panel to start seeing how foreground points affect the segmentation
Once we are satisfied with the segmentation we can Submit Label
We repeat the last four steps until our dataset is annotated
Annotating a Custom Dataset
To annotate a custom dataset using DeepEdit, we can download the DeepEdit app as above,
however, the dataset directory need not be populated. Follow the commands below to setup
custom dataset annotation using the empty local directory my_dataset as the image and
label storage location.
# install MONAI Label
pip install monailabel

# download DeepEdit sample app to local directory
monailabel apps --name radiology --download --output .

# create an empty folder for the custom dataset
mkdir my_dataset

# start the DeepEdit app in MONAI label server
# on the empty dataset folder
monailabel start_server --app radiology --studies my_dataset --conf models deepedit
We can follow the instructions in the previous section to install and connect 3D Slicer to MONAI Label Server, however, in this scenario we will instead load a file into MONAI Label Server through 3D Slicer.
Load an image file by navigating the menu bar File -> Add Data
Click the referesh button under MONAI Label Server to connect to the server
Click the Upload Volume button to upload the new image onto the server

Now, all DeepEdit functions should be available to use and we use foreground and background clicks
DeepEdit Annotation Using OHIF
As of version 0.2.0, MONAI Label server supports connectivity to a remote DICOM server via DICOMweb. All we need
when starting MONAI Label server is to specify the URL of the DICOMweb service in the studies argument (and optionally
the username and password for DICOM servers that require them).
If you do not have a DICOM server available for usage but would like to set one up please follow the instructions in the next section, otherwise skip to DeepEdit Annotation in OHIF.
Setup Development DICOM Server
Orthanc is an open-source lightweight DICOM server for medical imaging. To setup an instance of Orthanc on your machine of choice follow the guides below.
Ubuntu
# Install orthanc and dicomweb plugin
sudo apt-get install orthanc orthanc-dicomweb -y

# stop the existing Orthanc instance if there is one
sudo service orthanc stop

# setup and upgrade Orthanc libraries
sudo wget https://lsb.orthanc-server.com/orthanc/1.9.7/Orthanc --output-document /usr/sbin/Orthanc
sudo rm -f /usr/share/orthanc/plugins/*.so

sudo wget https://lsb.orthanc-server.com/orthanc/1.9.7/libServeFolders.so --output-document /usr/share/orthanc/plugins/libServeFolders.so
sudo wget https://lsb.orthanc-server.com/orthanc/1.9.7/libModalityWorklists.so --output-document /usr/share/orthanc/plugins/libModalityWorklists.so
sudo wget https://lsb.orthanc-server.com/plugin-dicom-web/1.6/libOrthancDicomWeb.so --output-document /usr/share/orthanc/plugins/libOrthancDicomWeb.so

# start
sudo service orthanc restart
Windows
Download and Install Orthanc from https://www.orthanc-server.com/download.php.
The Orthanc DICOM server on the chosen machine. You can check if the server is running
by navigating to http://127.0.0.1:8042 or using the remote machine’s address and entering
the username/password orthanc/orthanc.
The DICOMweb service for Orthanc runs on http://127.0.0.1:8042/dicom-web by default. You can check if the DICOMweb endpoint is active by issuing the following command
curl -X GET -v http://127.0.0.1:8042/dicom-web
You may encounter a 401 Unauthorized response when username and password are required.
Warning
When trying to access Orthanc remotely, please make sure you update the default configuration to allow for remote connections, by opening
/etc/orthanc/orthanc.json and setting RemoteAccessAllowed to true.
Adding Data to Development DICOM Server
If you do not have access to DICOM data to upload to the DICOM server you can convert from the NIFTI available via MONAI Label.
# install MONAI Label (if you have not already)
pip install monailabel

# Install `plastimatch` NIFTI to DICOM converter
sudo apt-get install plastimatch -y

# download Task 2 MSD dataset
monailabel datasets --download --name Task09_Spleen --output .

# convert one of the NIFTI images to DICOM
plastimatch convert --patient-id patient1 --input Task09_Spleen/imagesTs/spleen_1.nii.gz --output-dicom dicom_output
Now, we can upload the DICOM series in dicom_output using the upload link in Orthanc.
You may use plastimatch to convert more NIFTI files to DICOM to keep populating the development DICOM server.
DeepEdit Annotation in OHIF
We follow a very similar set of commands as in Deploy MONAI Label Server, however, we use the DICOMweb
endpoint of our DICOM server, which based on the last section is http://localhost:8042/dicom-web.
# install MONAI Label (if you have not already)
pip install monailabel

# download DeepEdit sample app to local directory
monailabel apps --name radiology --download --output .

# For MONAI Label version <=0.2.0, pass credentials and start the DeepEdit app in MONAI label server
# and start annotating images in our DICOM server
monailabel start_server --app radiology --studies http://localhost:8042/dicom-web --conf models deepedit

# For MONAI label version >=0.3.0, if you have authentication set for dicom-web then you can pass the credentials using environment
#`variables <https://github.com/Project-MONAI/MONAILabel/blob/main/monailabel/config.py>`_ while running the server.
monailabel start_server --app apps/radiology --studies http://127.0.0.1:8042/dicom-web --conf models deepedit
At this point OHIF can be used to annotate the data in the DICOM server via the MONAI Label server /ohif endpoint
(e.g. via http://127.0.0.1:8000/ohif).
Note
Here, user may also perform annotation using 3D Slicer by following the same instructions as in section DeepEdit Annotation in 3D Slicer.
Tutorial 2 - Bundle App Tutorial and Use Cases
Introduction:
Customized Networks for MONAI Label
This tutorial introduces the usage of the Bundle app in MONAILabel - monai bundle.
The Bundle App empowers MONAILabel with customized models, pre- and post-processing, and any anatomies for labeling tasks. The Bundle App supports various bundle based training / inference pipelines within the Model Zoo Release.
Learn more about MONAI Bundle.
Highlights and Features:
Supporting customized models and networks such as SwinUNETR, AutoML, etc.
Advancing heterogeneous dataset (e.g., CT, MRI, Pathology, etc) with corresponding pre- and post-processing modules.
Ready-to-Use inference of hundreds of anatomies (e.g., multi-organ abdominal segmentation, whole-brain segmentation) with trained model checkpoints.
Deploying robust interactive labeling tools such as DeepEdit.
Model Zoo for MONAI Label
MONAI Model Zoo hosts a collection of medical imaging models in the MONAI Bundle format. All source code of models (bundles) are tracked in models/, and for each distinct version of a bundle, it will be archived as a .zip file (named in the form of bundle_name_version.zip) and stored in Releases.
The MONAI Bundle defines the model package and supports building python-based workflows via structured configurations
Self-contained model package with all the necessary information.
Structured config that easy to override or reconstruct the workflow.
Config provides good readability and usability by separating parameter settings from the python code.
Config describes flexible workflow and components, allows for different low-level python implementations.
Currently available bundles: Model-Zoo.
Prerequisite Setup
1. Install MONAI Label and 3D Slicer
For detailed setups of MONAILabel and 3D Slicer, refer to the installation steps guide if MONAILabel is not installed yet.
2. Add MONAI Label Plugin in 3D Slicer
Add 3D Slicer with in-built MONAI Label plugin if not setup yet. Refer to Step 3 in installation guide.
Use Case 1: Bundle for SwinUNETR Multi-Organ Segmentation
On the local machine follow the commands listed below to install MONAI Label, and deploy the bundle app and standard dataset on the MONAI Label server.
Step 1: Install and start MONAI Label server with the Bundle app.
# install MONAI Label
pip install monailabel

# download Bundle sample app to local directory
monailabel apps --name monaibundle --download --output .

# download a local study images, sample dataset such as spleen:
monailabel datasets --download --name Task09_Spleen --output .

# start the bundle app in MONAI label server
# the MONAI Bundle app requires access to MODEL ZOO, please set the authentication token first.
export MONAI_ZOO_AUTH_TOKEN=<Your github auth token>
# and start annotating the images using bundle with the Swin UNETR bundle
monailabel start_server --app monaibundle --studies Task09_Spleen/imagesTr --conf models swin_unetr_btcv_segmentation
Step 2: Start 3D Slicer.
Step 3: Start the SwinUNETR bundle and follow clicks.
On the menu bar navigate click MONAI Label
Check the Model Zoo loading, MONAI Bundle app, and load study image
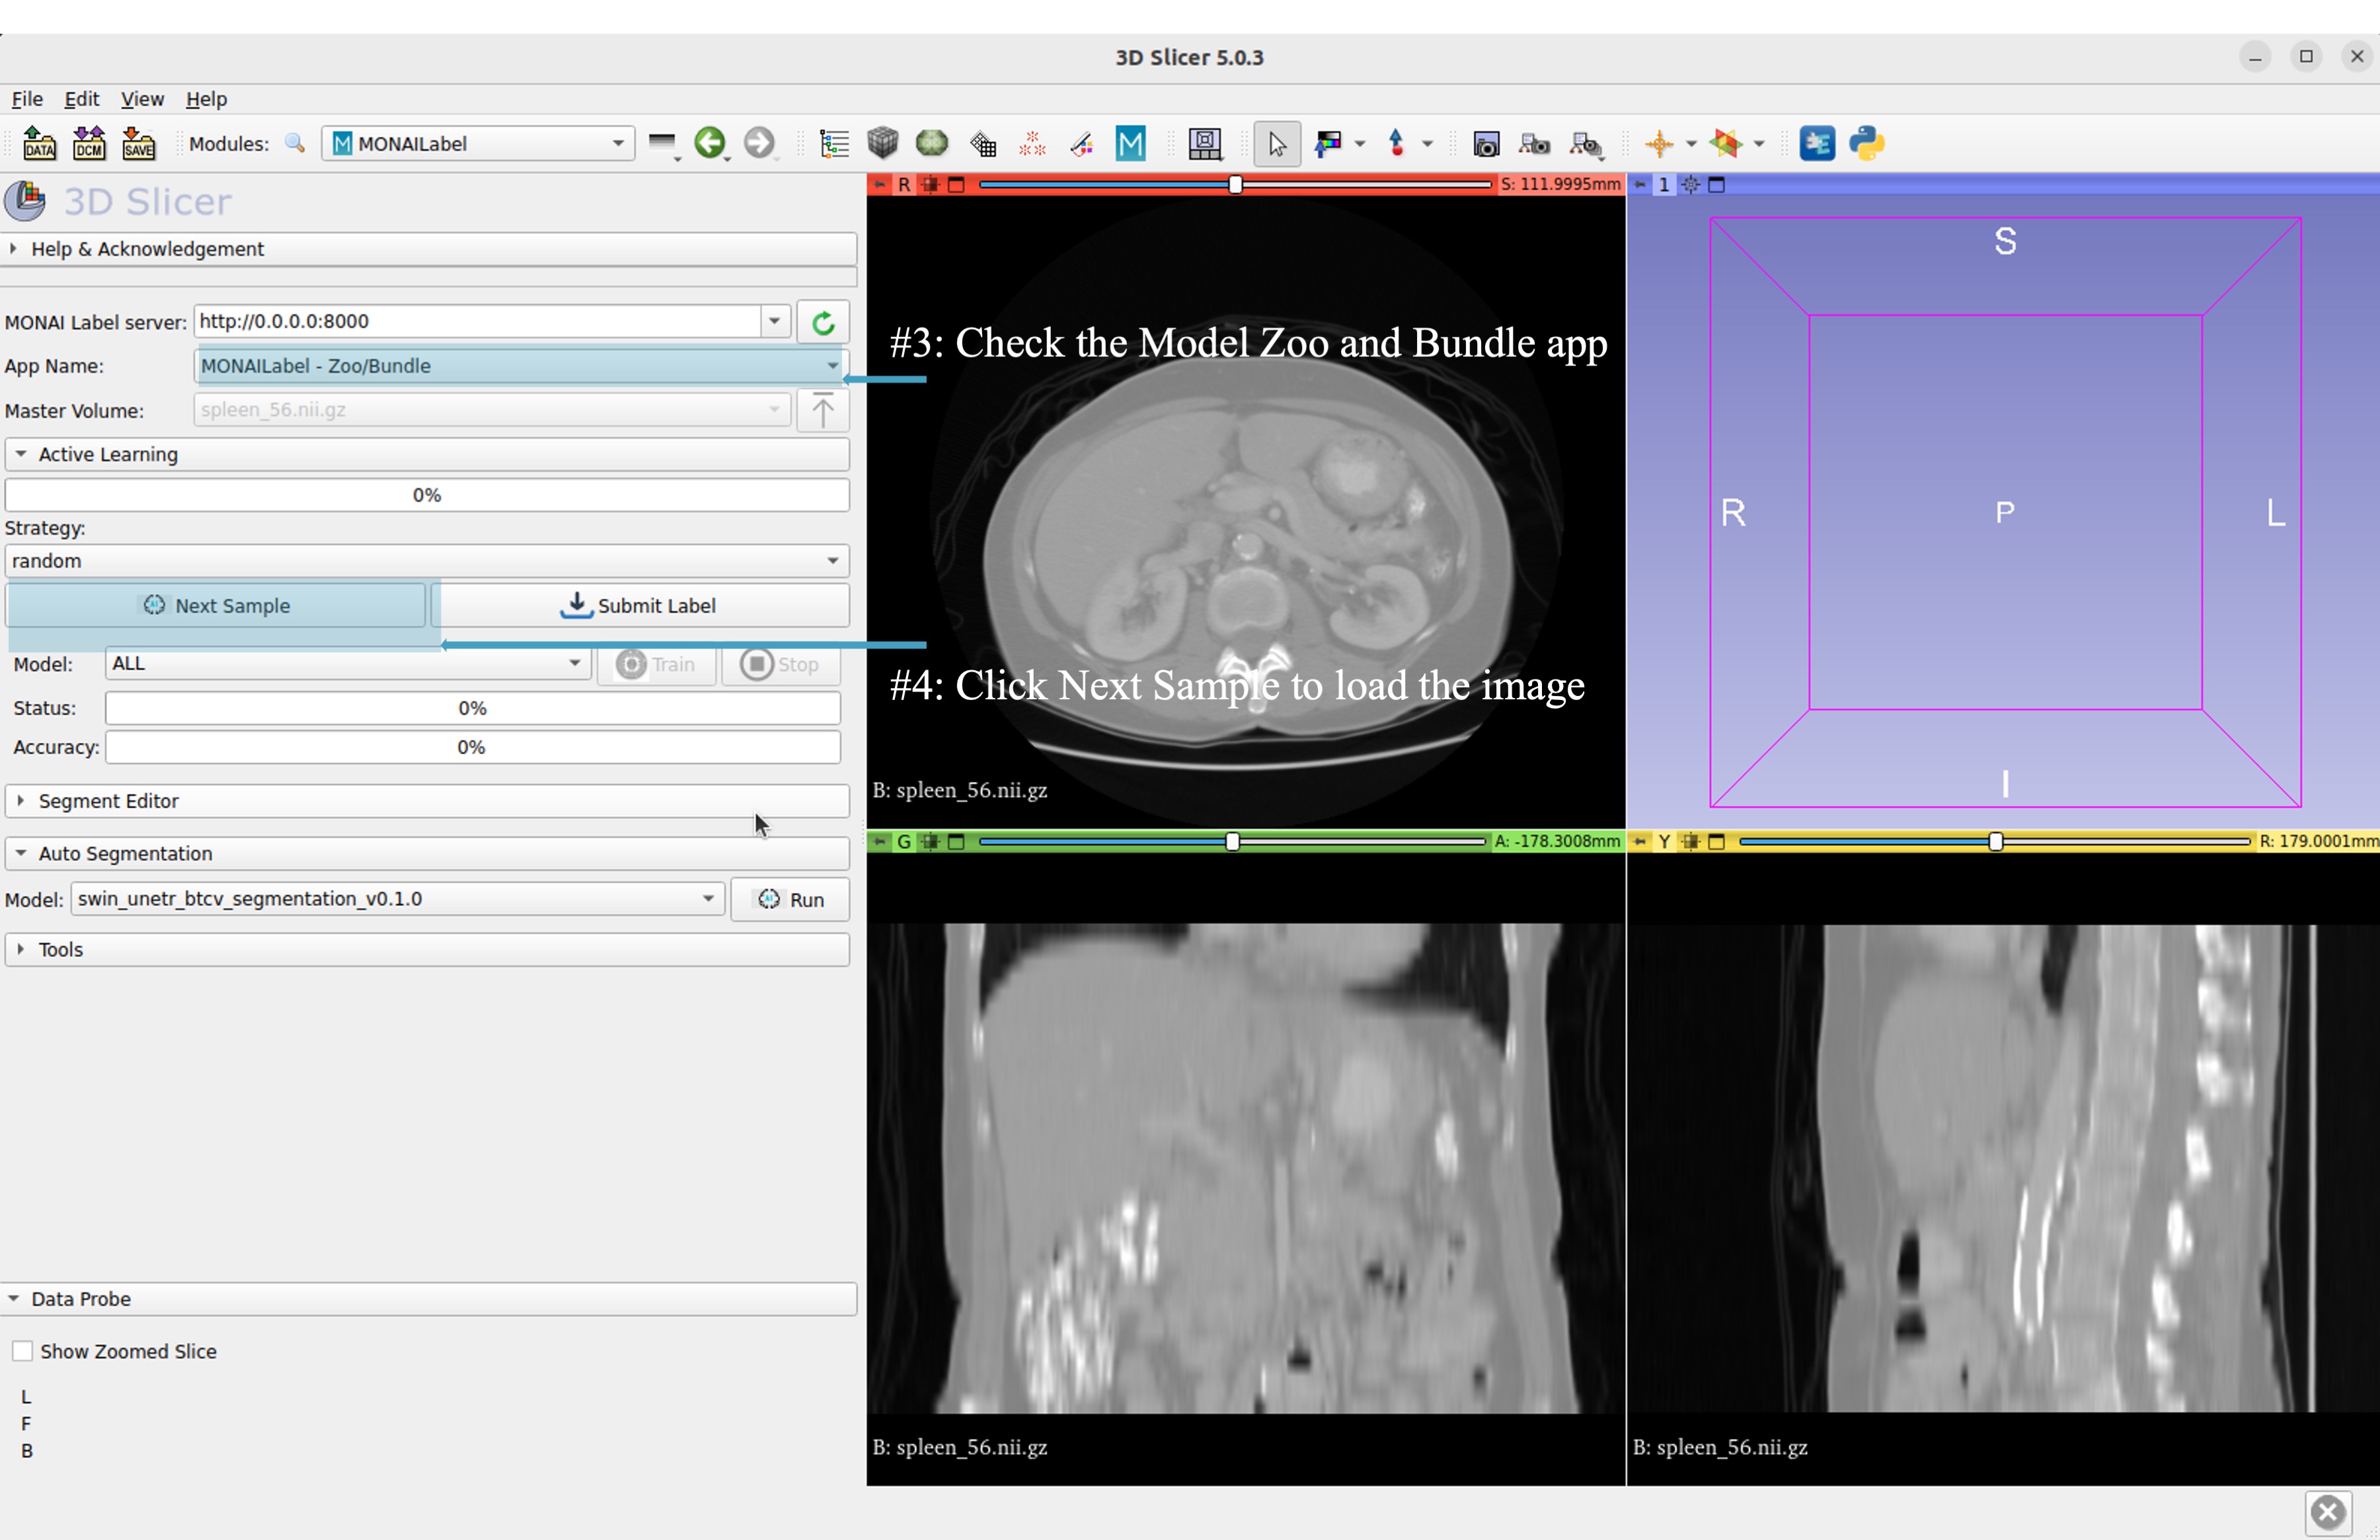
Select bundle models and obtain automatic labels
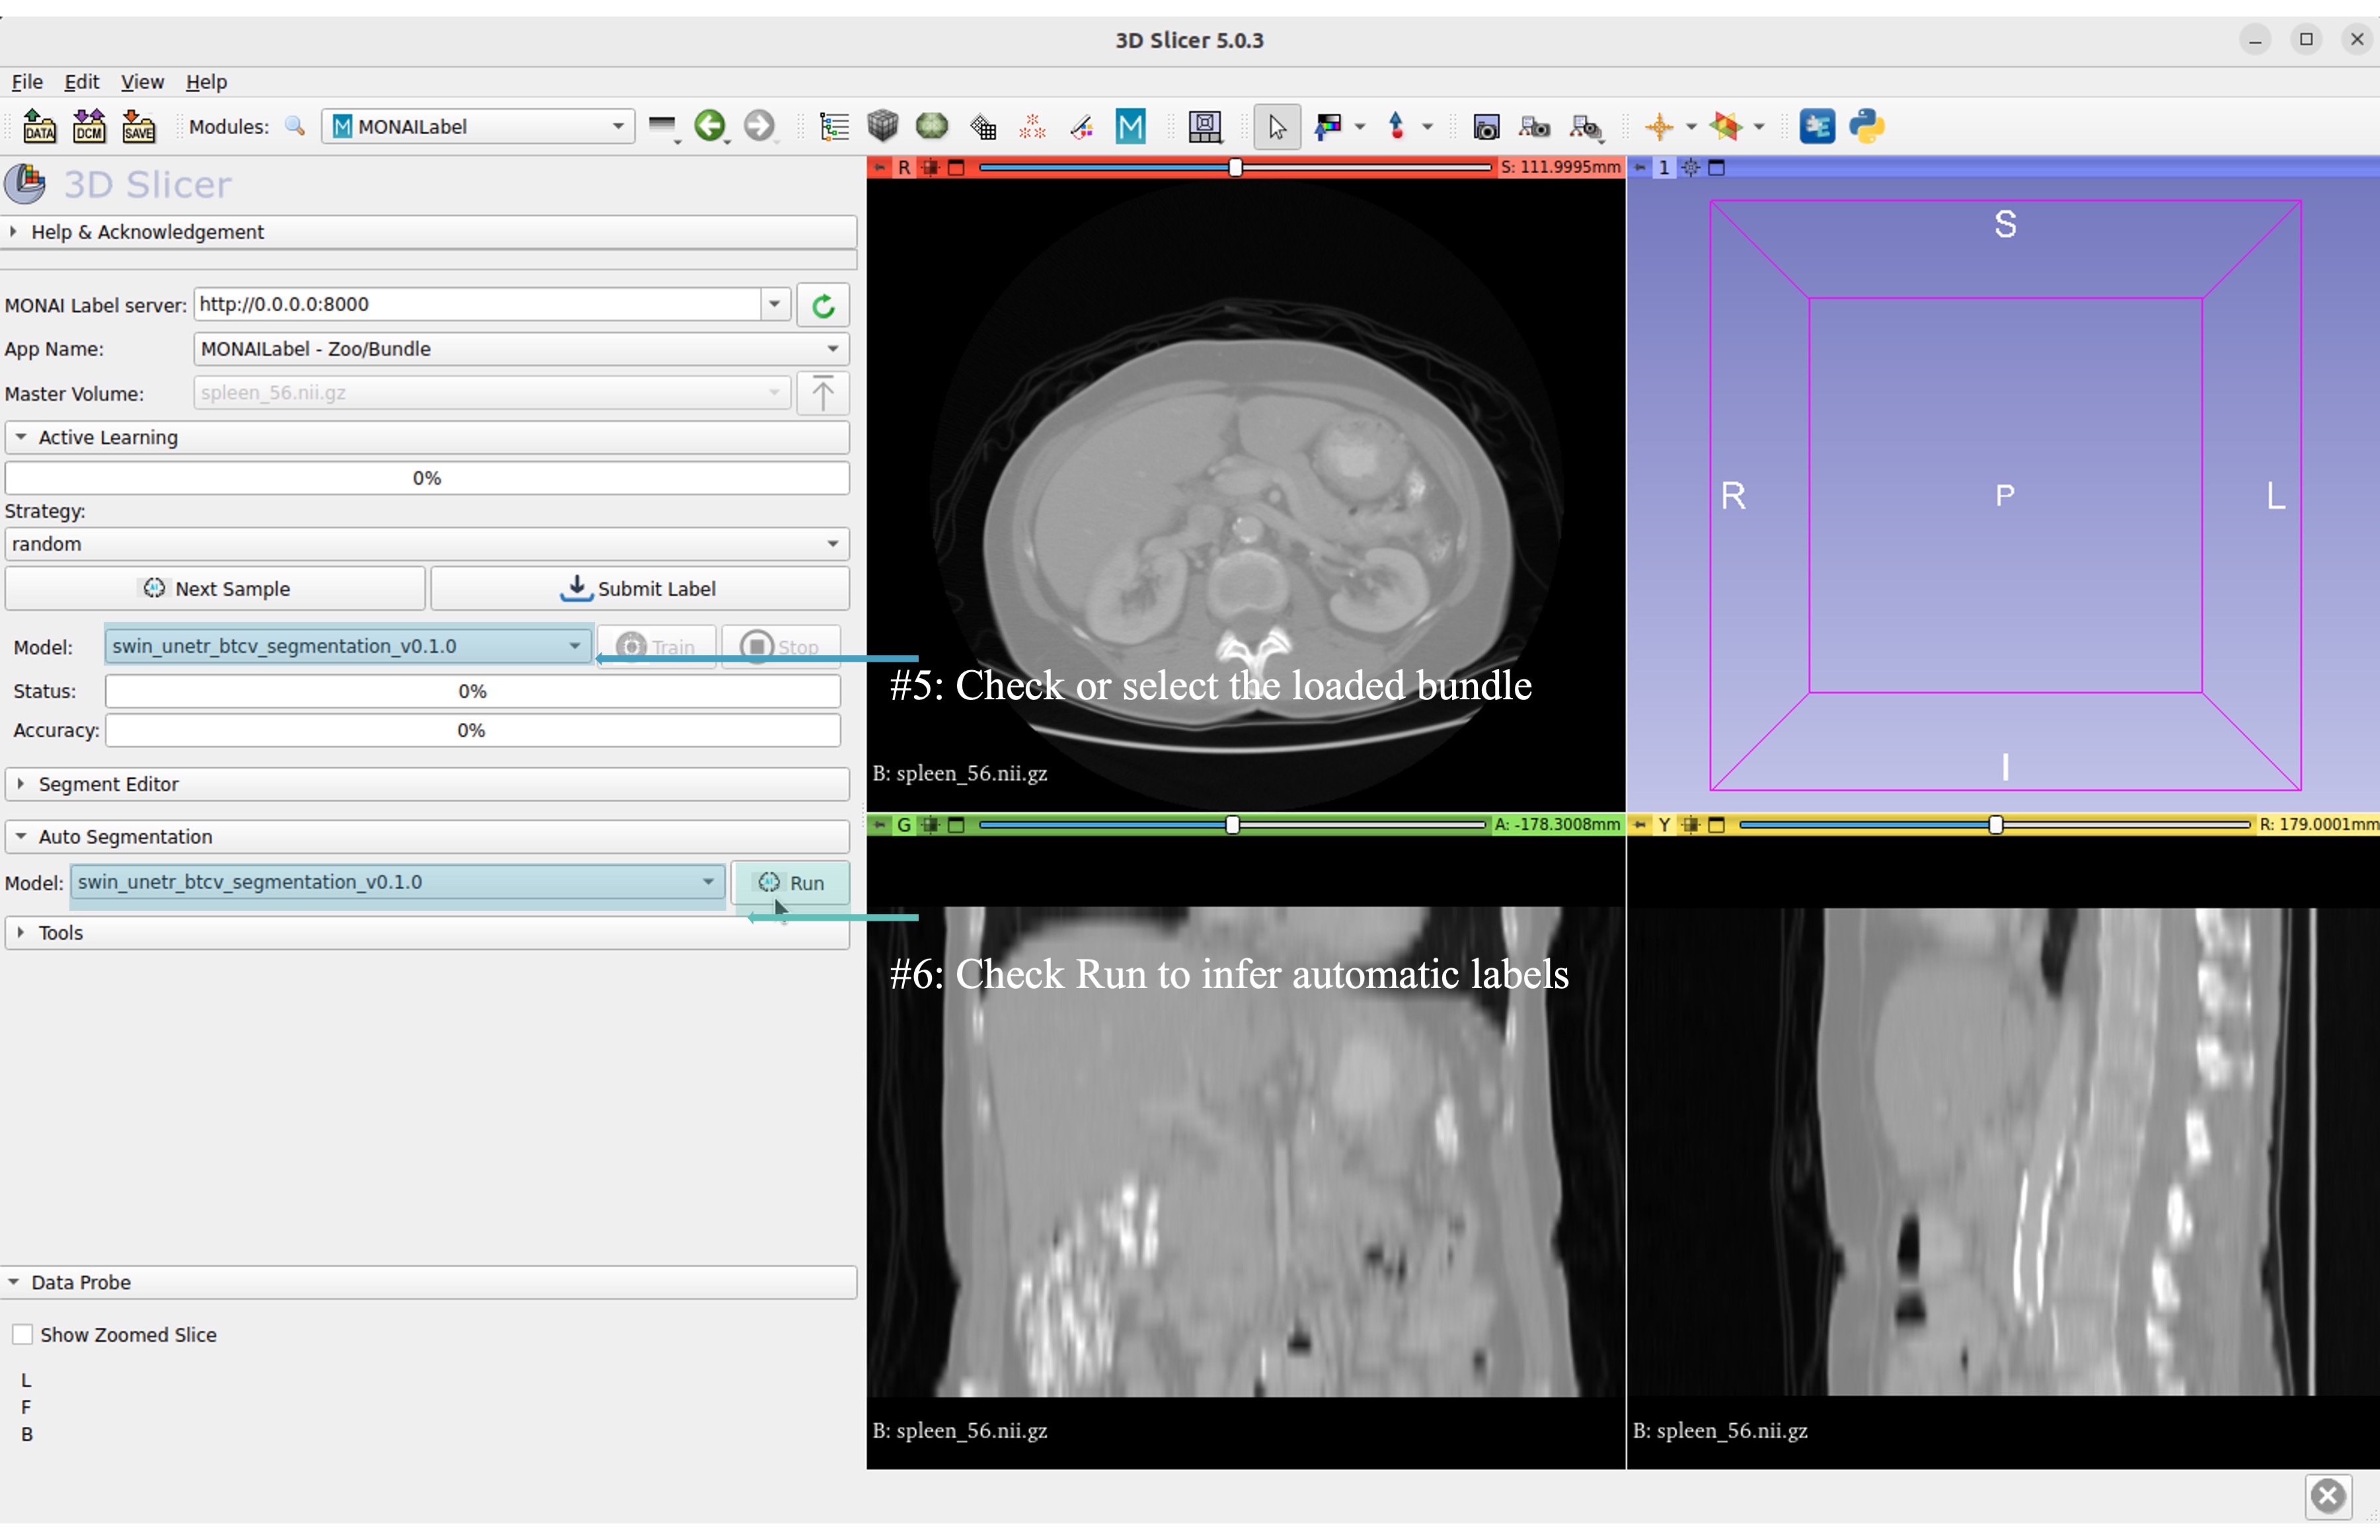
Now get the automatic inference of the trained SwinUNETR model!
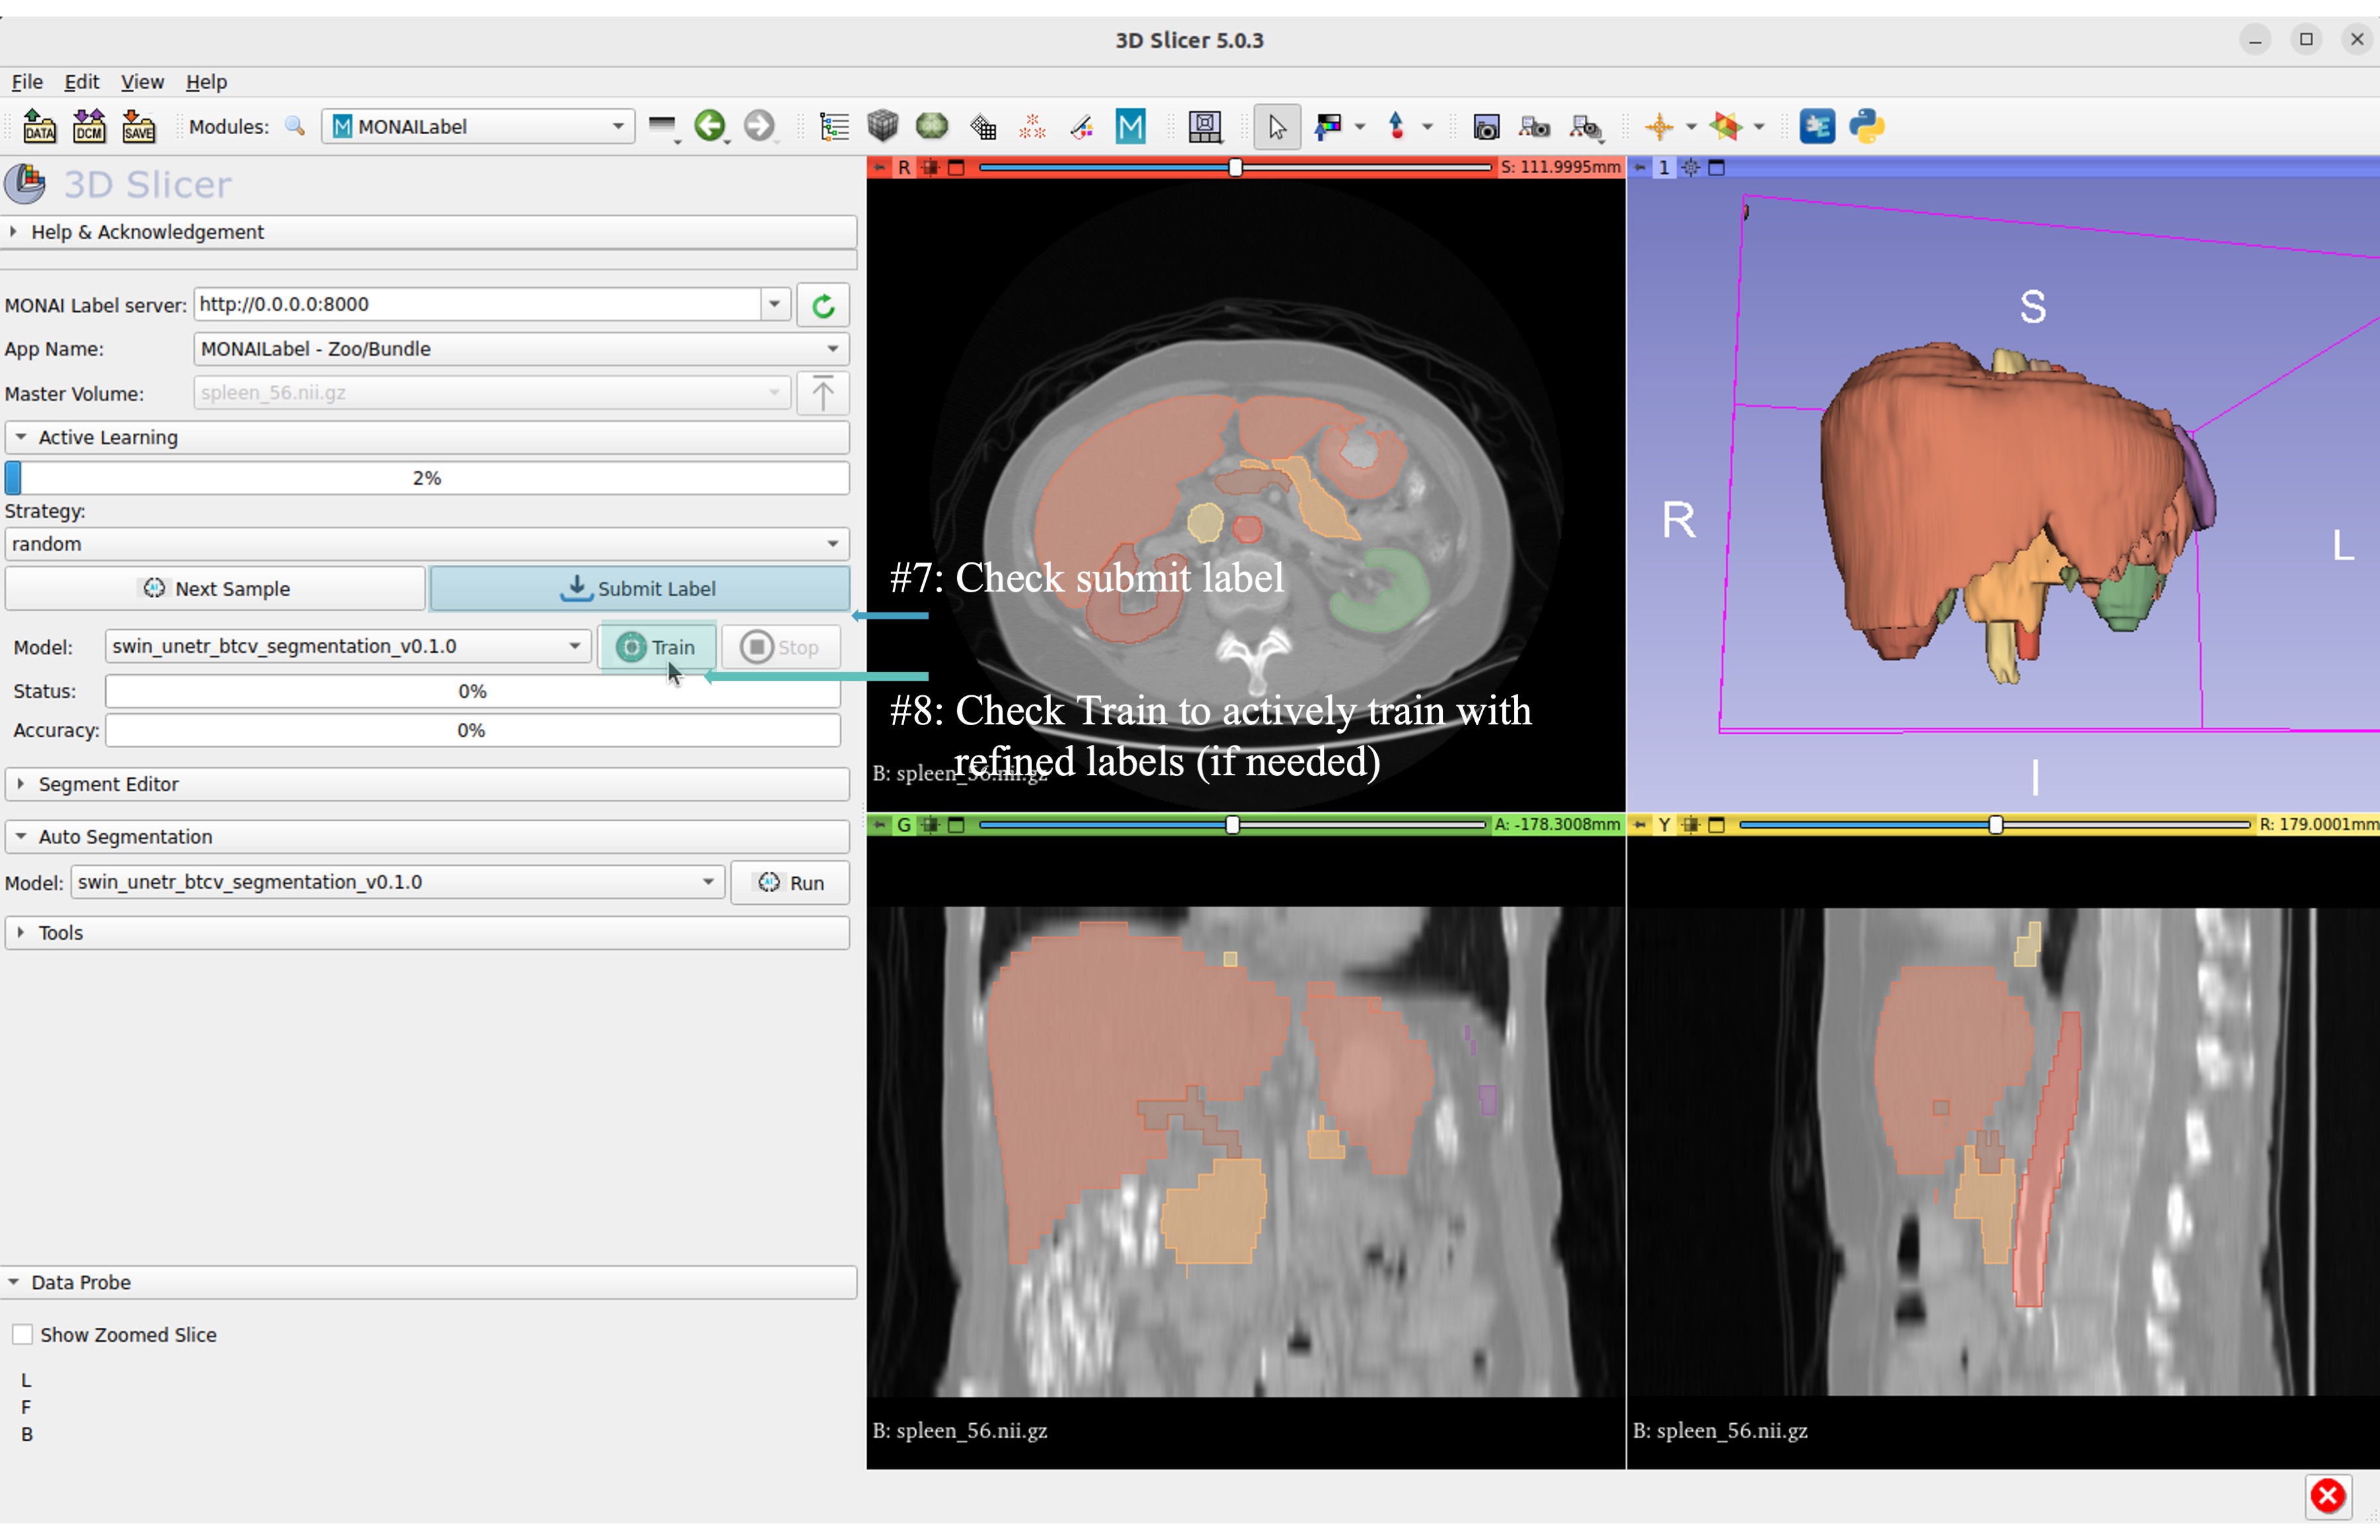
Submit refined labels and train to fine-tune the model
Use Case 2: Bundle with Customized Scripts for Renal Substructure Segmentation
This use case (renalStructures_UNEST_segmentation) provides an instruction on using bundle model with customized scripts.
Prerequisite: Check Model Zoo Release.
# Step 1: install MONAI Label
pip install monailabel

# Step 2: download Bundle sample app to local directory
monailabel apps --name monaibundle --download --output .

# Step 3: download a local study images, sample dataset such as spleen CT (contrast enhanced CTs are better):
monailabel datasets --download --name Task09_Spleen --output .

# Step 4: start the bundle app in MONAI label server
# the MONAI Bundle app requires access to MODEL ZOO, please set the authentication token first.
export MONAI_ZOO_AUTH_TOKEN=<Your github auth token>
monailabel start_server --app monaibundle --studies Task09_Spleen/imagesTr --conf models renalStructures_UNEST_segmentation
Start 3D Slicer and follow same MONAI Label plugin process MONAI Label
Select the customized bundle and inference with pre-trained model for renal structure segmentation
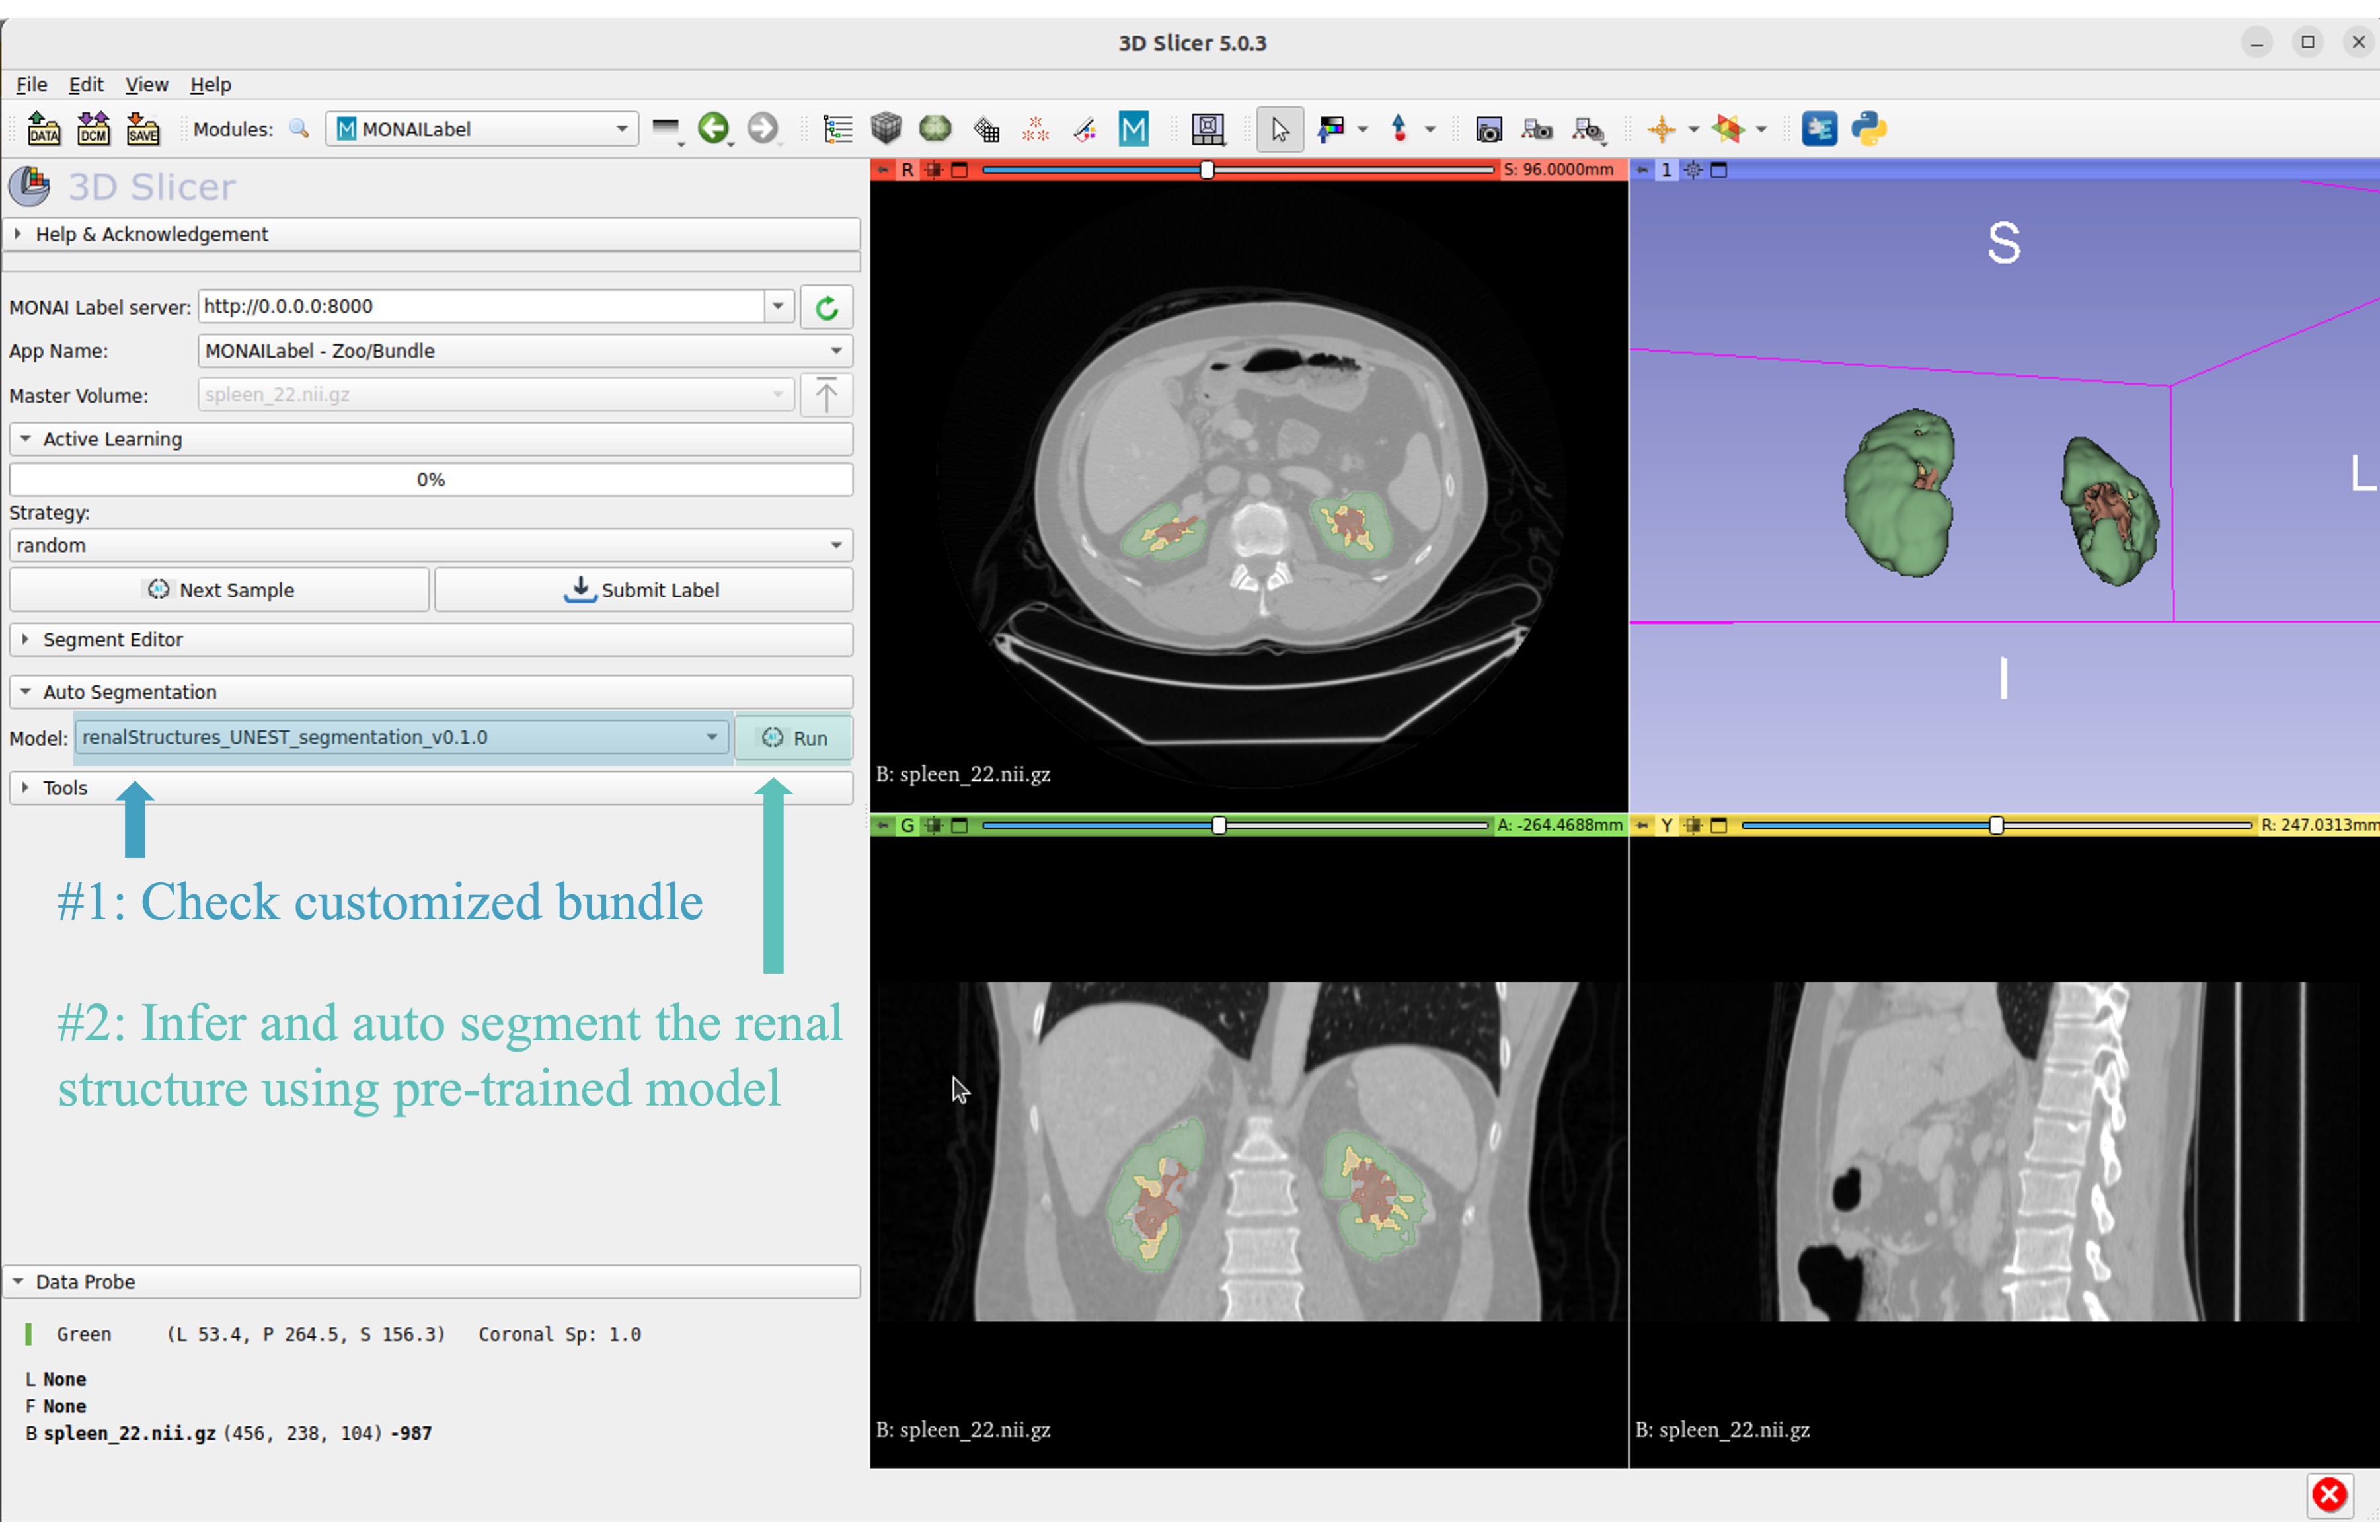
Get inferred label with renal cortex, medulla, and collecting system.