Quickstart
MONAI Label server currently supports the annotation of local datasets via 3DSlicer, such as unlabeled images residing on disk, and remote data residing on DICOMweb-enabled PACS systems via both 3DSlicer and OHIF.
To setup a local dataset for annotation follow the instructions under DeepEdit Annotation with 3DSlicer.
To perform annotation of data residing on a remote DICOMweb-accessible PACS follow the instructions under DeedEdit Annotation Using OHIF
DeepEdit Annotation with 3DSlicer
Deploy DeepEdit on MONAI Label Server
On the local machine follow the commands listed below to install MONAI Label, download a sample application (DeepEdit left atrium annotation), download a sample dataset (MSD heart MRI), and deploy the sample app and standard dataset on the MONAI Label server.
# install MONAI Label
pip install monailabel

# download DeepEdit sample app to local directory
monailabel apps --name deepedit --download --output .

# download Task 2 MSD dataset
monailabel datasets --download --name Task02_Heart --output .

# start the DeepEdit app in MONAI label server
# and start annotating the downloaded images
monailabel start_server --app deepedit --studies Task02_Heart/imagesTr
Install MONAI Label Plugin in 3DSlicer
Install 3DSlicer Preview Version with in-built MONAI Label plugin
Download and Install 3D Slicer and choose one of the download links under Preview Release
Start 3DSlicer
On the menu bar navigate View -> Extension Manager -> Active Learning -> MONAI Label
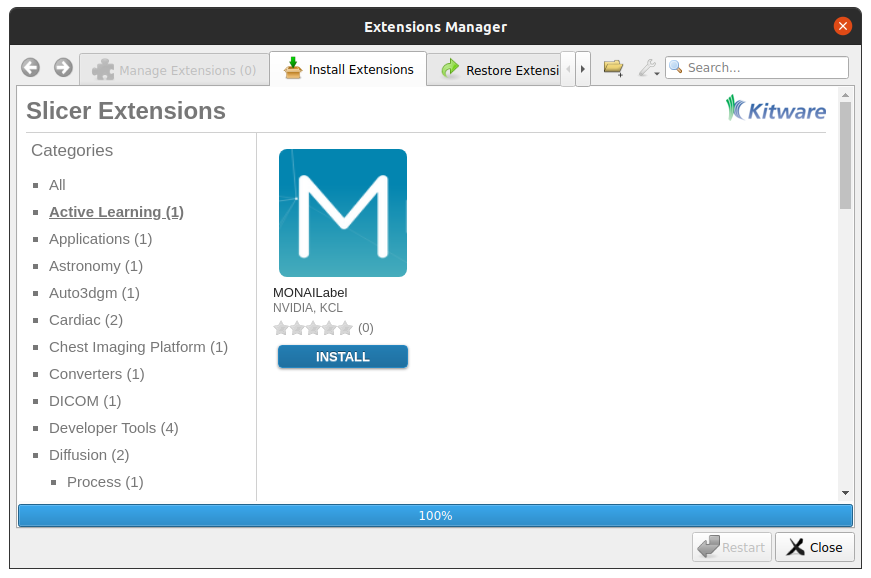
Install MONAI Label plugin (click “Install”)
Restart 3D Slicer (click “Restart” in the same dialog box)
To add the MONAI Label icon shortcut on the 3DSlicer toolbar
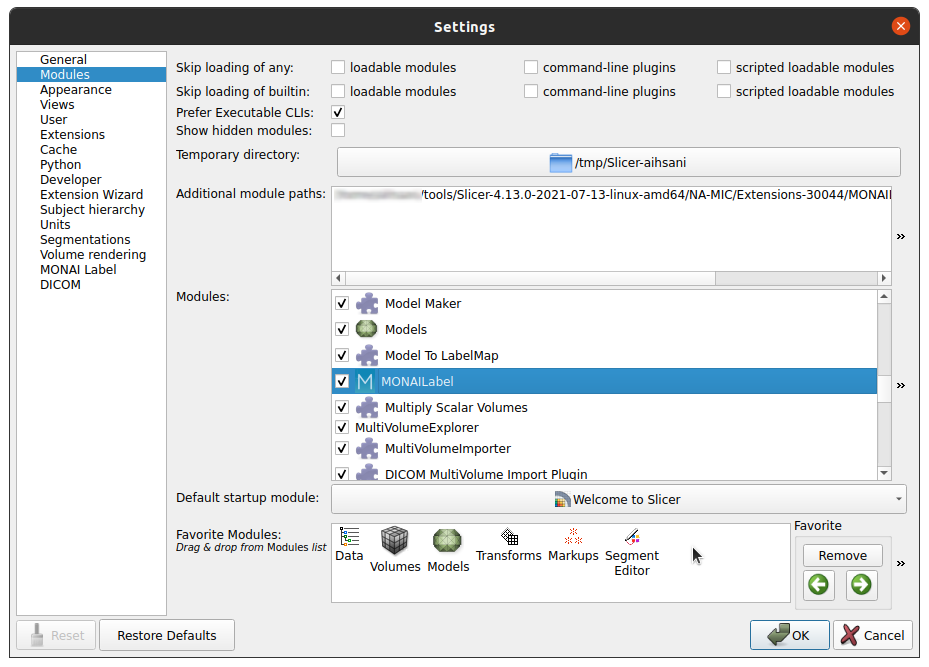
Navigate Edit -> Application Settings
Under the Modules panel drag MONAI Label into Favorite Modules
Restart 3DSlicer
Look for the MONAI Label module icon
 in the 3DSlicer toolbar
DeepEdit Annotation in 3DSlicer
To connect 3DSlicer to MONAI Label Server
Click on the MONAI Label module icon
Click the refresh icon near next to the MONAI Label server input field
If the MONAI Label server is running locally to 3DSlicer you do not need to enter the server address

To annotate the downloaded heart MR images using DeepEdit
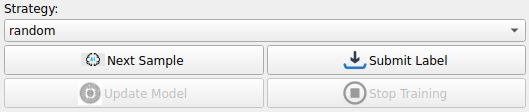
Click Next Sample under Strategy to retrieve an image from the heart dataset along with a segmentation result generated by DeepEdit
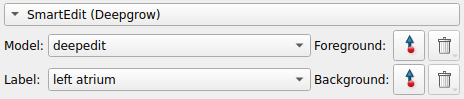
We can now start making adjustments to the initial segmentation provided by adding foreground and background points using the tools in the SmartEdit section
For example, click on the foreground button and start clicking on the image panel to start seeing how foreground points affect the segmentation
Once we are satisfied with the segmentation we can Submit Label
We repeat the last four steps until our dataset is annotated
Annotating a Custom Dataset
To annotate a custom dataset using DeepEdit, we can download the DeepEdit app as above,
however, the dataset directory need not be populated. Follow the commands below to setup
custom dataset annotation using the empty local directory my_dataset as the image and
label storage location.
# install MONAI Label
pip install monailabel

# download DeepEdit sample app to local directory
monailabel apps --name deepedit --download --output .

# create an empty folder for the custom dataset
mkdir my_dataset

# start the DeepEdit app in MONAI label server
# on the empty dataset folder
monailabel start_server --app deepedit --studies my_dataset
We can follow the instructions in the previous section to install and connect 3DSlicer to MONAI Label Server, however, in this scenario we will instead load a file into MONAI Label Server through 3DSlicer.
Load an image file by navigating the menu bar File -> Add Data
Click the referesh button under MONAI Label Server to connect to the server
Click the Upload Volume button to upload the new image onto the server

Now, all DeepEdit functions should be available to use and we use foreground and background clicks
DeedEdit Annotation Using OHIF
As of version 0.2.0, MONAI Label server supports connectivity to a remote DICOM server via DICOMweb. All we need
when starting MONAI Label server is to specify the URL of the DICOMweb service in the studies argument (and optionally
the username and password for DICOM servers that require them).
If you do not have a DICOM server available for usage but would like to set one up please follow the instructions in the next section, otherwise skip to DeepEdit Annotation in OHIF.
Setup Development DICOM Server
Orthanc is an open-source lightweight DICOM server for medical imaging. To setup an instance of Orthanc on your machine of choice follow the guides below.
Ubuntu
# Install orthanc and dicomweb plugin
sudo apt-get install orthanc orthanc-dicomweb -y

# stop the existing Orthanc instance if there is one
sudo service orthanc stop

# setup and upgrade Orthanc libraries
sudo wget https://lsb.orthanc-server.com/orthanc/1.9.7/Orthanc --output-document /usr/sbin/Orthanc
sudo rm -f /usr/share/orthanc/plugins/*.so

sudo wget https://lsb.orthanc-server.com/orthanc/1.9.7/libServeFolders.so --output-document /usr/share/orthanc/plugins/libServeFolders.so
sudo wget https://lsb.orthanc-server.com/orthanc/1.9.7/libModalityWorklists.so --output-document /usr/share/orthanc/plugins/libModalityWorklists.so
sudo wget https://lsb.orthanc-server.com/plugin-dicom-web/1.6/libOrthancDicomWeb.so --output-document /usr/share/orthanc/plugins/libOrthancDicomWeb.so

# start
sudo service orthanc restart
Windows
Download and Install Orthanc from https://www.orthanc-server.com/download.php.
The Orthanc DICOM server on the chosen machine. You can check if the server is running
by navigating to http://localhost:8042 or using the remote machine’s address and entering
the username/password orthanc/orthanc.
The DICOMweb service for Orthanc runs on http://localhost:8042/dicom-web/ <http://locahost:8042/dicom-web> by default. You can check if the DICOMweb endpoint is active by issuing the following command
curl -X GET -v http://localhost:8042/dicom-web
You may encounter a 401 Unauthorized response when username and password are required.
Warning
When trying to access Orthanc remotely, please make sure you update the default configuration to allow for remote connections, by opening
/etc/orthanc/orthanc.json and setting RemoteAccessAllowed to true.
Adding Data to Development DICOM Server
If you do not have access to DICOM data to upload to the DICOM server you can convert from the NIFTI available via MONAI Label.
# install MONAI Label (if you have not already)
pip install monailabel

# Install `plastimatch` NIFTI to DICOM converter
sudo apt-get install plastimatch -y

# download Task 2 MSD dataset
monailabel datasets --download --name Task02_Heart --output .

# convert one of the NIFTI images to DICOM
plastimatch convert --patient-id patient1 --input Task02_Heart/imagesTs/la_001.nii.gz --output-dicom la_001_dicom
Now, we can upload the DICOM series in la_001_dicom using the upload link in Orthanc.
You may use plastimatch to convert more NIFTI files to DICOM to keep populating the development DICOM server.
DeepEdit Annotation in OHIF
We follow a very similar ser of commands as in Deploy DeepEdit on MONAI Label Server, however, we use the DICOMweb
endpoint of our DICOM server, which based on the last section is http://locahost:8042/dicom-web.
# install MONAI Label (if you have not already)
pip install monailabel

# download DeepEdit sample app to local directory
monailabel apps --name deepedit --download --output .

# start the DeepEdit app in MONAI label server
# and start annotating images in our DICOM server
monailabel start_server --app deepedit --studies http://locahost:8042/dicom-web --username orthanc --password orthanc
At this point OHIF can be used to annotate the data in the DICOM server via the MONAI Label server /ohif endpoint
(e.g. via http://localhost:8000/ohif).
Note
Here, user may also perform annotation using 3DSlicer by following the same instructions as in section DeepEdit Annotation in 3DSlicer.